Dirt Devil is one of the most reputable vacuum makers in the world. However, although easy to use, dirt devil hand vacuums might develop issues from time to time. A common occurrence with dirt devil hand vacuums is a broken belt.
If the Dirt Devil hand vacuum belt breaks, replacing it might seem complicated, but that’s far from the truth. Since the vacuum can’t function without the belt, you will have to know how to replace belt on dirt devil hand vacuum.
Let’s get right to it.
Contents
Replacing the Belt on A Dirt Devil Vacuum

Replacing the belt isn’t much of an issue and won’t need you to go for overly complicated equipment. All you will need is a screwdriver to change the belt.
So how do you do it?
Step 1
A dirt devil is an electric appliance, and you will need to remove it from the electrical socket. A lock on the vacuum handle lets you lower the vacuum’s upper part to the ground by pressing it. With the vacuum on the floor, set it up such that you have access to the bottom.
Step 2
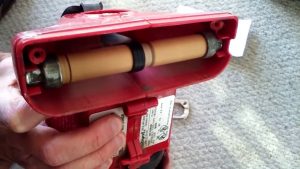
Once you have access to the vacuum’s bottom part, see five screws that hold everything together. Use the screwdriver and unloosen all the screws. Removing the five screws will let you remove the guard.
Place the screws and the guard somewhere safe. The screws are tiny and might easily disappear.
Step 3
The belt will usually be on the roller brush. After removing all the screws, you will gain access to the roller brush. Pull out the roller brush, then detach the broken belt from it. You can do that by carefully pushing it to the right, then pulling it off.
It shouldn’t be that hard to remove if the belt is broken. A broken belt will leave a few rubber pieces that you should also remove.
Step 4
Now get your new belt and put one end on the vacuum’s motor shaft. Put the roller brush through the belts loop on the other end, then pull the roller shaft ends for the belt to form a tight fit. Keep pushing it down until you see it securely in place. The roller brush’s ends should easily slot back in after the pushing.
Step 5
Now replace the guard and secure it with the screws you had earlier removed. Plug the vacuum back on to the power and test whether the operation was successful. If it doesn’t start working well, it means you didn’t do right.
That’s, however, quite rare.


Last update on 2024-07-11 / Affiliate links / Images from Amazon Product Advertising API
What Does the Belt Do on the Dirt Devil Vacuum?
The belt is usually on the roller brush and helps collect dirt as the vacuum moves over a surface. Its principal function is to ensure the tension of the brush roller is just right to make the vacuum efficient at collecting dirt.
Therefore, a problem with the belt will lead to inefficient cleaning by your vacuum. That would suggest that the belt isn’t helping the roller brush retain most of the tension it needs to get everything clean.
That results in the roller brush rotating at a slow speed and thus inefficiency in the cleaning process.
Read Also: How to Take Apart A Dirt Devil Vacuum Cleaner
How do You Know a Belt Needs Changing?
While the belt might lose its tension, it doesn’t always look worn out. It might be hard to tell if the belt is broken just by looking at it. However, there are several tells to a broken belt.
The most obvious sign of a broken belt is inefficient cleaning. If your vacuum was previously good at getting hair off carpets or furniture, that would change. You might notice its struggle to eliminate small amounts of debris on floors.
The other thing to look out for is a slow speed. A broken belt means the rotating speed of the roller brush won’t be that fast. It will thus take you a long time to clean dirt off a floor or carpet.
Those are the two significant signs of a broken belt. Although these signs are clear and hard to miss, ideally, it is good to change the belt often. But what would be the best time interval to do that?
Three months.
If you are a heavy user, the belt might tire sooner, but the best time to change it is after three months of use. Remember, the belt doesn’t have to look worn out for it not to be doing its job.
Read Also: Top 7 Best Mop for Dog Hair
How Do I Get a Belt Compatible with My Vacuum?
The vacuum belt is like a spare part for the vacuum. When buying car spare parts, you often have to know the care model to ensure you get the spare parts right, don’t you?
It is the same with a vacuum belt. Belt compatibility is a crucial thing to consider. The buyer’s manual you go when buying the vacuum will have all the information you need. You will need to check it to know the right belt for your vacuum.
Woe unto you if you get the wrong belt for your vacuum. That will only prolong your wait for the return of your vacuum’s cleaning efficiency. Worse still, the wrong belt could end up not fitting the vacuum and losing your money.
If you are unsure of the model and belt you need to get, consult a specialist. A vacuum specialist will help you get the right belt for your vacuum and even help you replace it if you can’t.


Last update on 2024-07-11 / Affiliate links / Images from Amazon Product Advertising API
FAQs About Replace Belt On Dirt Devil Hand Vacuum
Where do I find the belt in a dirt devil vacuum?
The belt is usually on the roller brush. Once you have opened the vacuum up, you will notice the belt encircling the roller brush.
How often should I change the belt on my dirt devil vacuum?
Depending on usage, three months should be okay for you to change your dirt devil’s belt.
Do all Dirt devil vacuums use the same belt?
Although specific models of dirt devil vacuums can share a belt, that’s not true for all models. It is always best to check the model number to get the ideal belt for your dirt devil.
Where is the belt located on a Dirt Devil vacuum?
The belt is located on the powerhead, which is a cylinder with a brush roll attached to it. This vacuum also has a bag compartment that can be emptied. You unscrew a cap and then pull out the bag, remove the dirt from it, and then put it back in.
Do all Dirt Devil vacuums use the same belt?
There are a few different models of dirt devil vacuums that use a different belt, but most dirt devils use a V-belt. Most Dirt Devils use a v-belt, but there are a few that use a cogged belt or a waving belt.
How do you remove a Dirt Devil brush?
It is not recommended to remove the Dirt Devil brush. Customers are able to replace their own brushes, as long as they have taken care of proper maintenance for their device. This will ensure that the Dirt Devil will continue to run efficiently for years.
Final Thoughts
We hope you now know how to replace belt on dirt devil hand vacuum. The steps we have outlined are simple and easy to follow. Remember to be changing the belt every three months to ensure your vacuum works effectively.
Relevant Resources:
- Top 9 Best Vacuum For Luxury Vinyl Plank Floors
- 11 Best Vacuum for Concrete Floors
- Best Vacuums Without Beater Bar
- Top 7 Best Vacuum For House Cleaning Business
- 7 Best Vacuum With Retractable Cord
- Top 11 Best Lightweight Vacuum Cleaner for Elderly
- Top 5 Best Central Vacuum System for Pet Hair
- Top 9 Best Vacuum for Fleas Reviews & Buying Guides
- 5 Best Walk Behind Leaf Vacuum Mulcher
- Top 7 Best Commercial Leaf Vacuum Reviews
- 7 Best Cordless Backpack Vacuum Cleaner
- Top 7 Best Garage Vacuum Wall Mounted
- Top 5 Best Shop Vac for Drywall Dust